|
<< Click to Display Table of Contents >> AutoLine - Automatic connection of inserted symbols |
  
|
|
<< Click to Display Table of Contents >> AutoLine - Automatic connection of inserted symbols |
  
|
AutoLine is a feature that may be used when inserting symbols. It allows lines to be drawn automatically and directly from the inserted symbol, in the applicable directions. Additionally, it makes it possible for the user to switch between different symbol versions, like between vertical and horizontal versions of the same basic symbol.
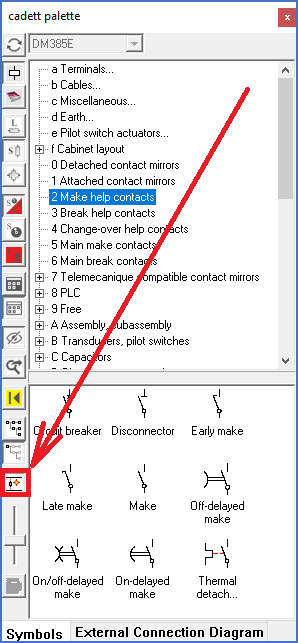
AutoLine is activated or deactivated with a button to the left in the Symbol Insert Tool, as shown in the figure below.

Figure 1006: The "AutoLine" feature is turned on or off using the button that is shown here.
•When AutoLine is ON, lines will automatically be added to symbols that are inserted, whenever that is possible. However, the user always has the option to skip these lines by pressing the <ESC> key.
With the <SPACE> bar, the symbol version is toggled, the <TAB> key can be used to switch the connection sequence for multi-phase lines, and the arrow keys can be used to move the connections to intersecting lines further away from the symbol.
•When AutoLine is OFF, no lines will be added when inserting symbols. Please note that the possibility to switch symbol version using the <SPACE> bar, like between vertical and horizontal, is then also turned off.
Please refer to Example 1: 1-phase vertical symbol sub-topic, which contains a simple example of how this works.
AutoLine tries to add lines from all connections points of the symbol, in the directions that are defined for each individual connection point. For each connection point, this is possible if the line that is drawn from there intersects with an existing line that it can connect to. If there are no such existing line, no line will be drawn. Please refer to Example 2: No intersecting lines available, which contains an example where no lines can be drawn.
If a symbol has multiple connection points in the same direction, like a 3-phase symbol, which normally has three, these connection points will by default be connected to separate lines. Using keyboard buttons, the user can quickly and easily adjust this, to his or her preference. Please refer to the Example 3: 3-phase vertical symbol sub-topic, which contains a good example of how this works.
More details about Switching between symbol versions are found in the sub-topic with that very name.
All available keyboard commands are listed and explained in the Keyboard commands sub-topic.
Please refer to the sub-topics that are listed below.
•Example 1: 1-phase vertical symbol
•Example 2: No intersecting lines available
•Example 3: 3-phase vertical symbol
•Switching between symbol versions