|
<< Click to Display Table of Contents >> Editing compositions for item designations |
  
|
|
<< Click to Display Table of Contents >> Editing compositions for item designations |
  
|
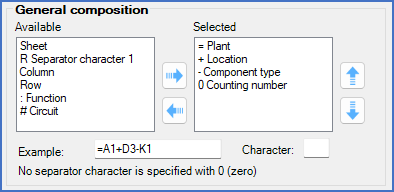
For each type of item designation, you can specify how item designations are assembled. This is done graphically. You use separate buttons to add or remove parts, and other buttons to move the selected parts within the item designation composition.

Figure 398: One of the compositions
The parts of which item designations can be assembled, are presented in two lists for each type of item designation. For separator character independent item designations, there are in fact two sets of two lists each for each type of item designation. Each set, however, works in a similar way.
•The left list shows the parts that are not part of the assembly ("Available").
•The right list shows the parts that are included in the current assembly. Those parts are presented in the order in which they will occur in the item designations, and with the separator characters that will be used ("Selected").
Please note that several parts have an embedded separator character. Two examples of that are Plant (function) and Location. Other parts do not have such embedded separator characters. Two examples of that are Column and Row.
Below the two lists that are described above, an example of an item designation according to the current assembly is presented.
You edit (change) the composition of item designations in the following manner:
•If you wish to add additional parts to the assembly, you first select the one to add in the left list, under the Available headline. Then, you click the button with an arrow that points to the right, between the Available and the Selected lists. The newly added part is then appended to the end of the Selected list.
•You can move a part within the item designation assembly, by first selecting it in the Selected list, and thereafter click the buttons with blue arrows that point up or down. If you click the "up button", the selected part will be moved upwards one step. In a corresponding way, if you click the "down button" the selected part will be moved downwards one step.
•If you wish to remove a part from the Selected list, you select that part and then click the arrow that points to the left. This will move the selected part from the Selected list to the Available list.
•If you wish to change the separator character that is associated with one of the selected parts, you first select the part in question in the Selected list. You can then change separator character in the Character field directly below the Selected list.
An important fact that should be given special attention here, is that there is a big difference between space as separator character, and no separator character at all. For that reason, there is a special way of defining “no separator”. “No separator” is written as a zero (“0”).
Please note that there are billions of possible compositions, many of them completely useless, or at least with important limitations. If you, for instance, define the same separator character for multiple parts, it will be impossible to separate those parts from one another, and you have created an ambiguous situation, which without doubt will lead to problems. That is if you are not using so-called separator character independent item designations. If you do, it is indeed possible to use the same separator character, or even no separator character at all, several times without creating conflicts or other problems.
If you therefore have chosen to activate Separator character independent item designations, the item designations will function quite differently than they otherwise would. The available parts are then partly different. Separator characters can still be specified, but they are not used to separate the parts. Several parts can, for instance, have the same separator character without creating problems.