|
<< Click to Display Table of Contents >> Document code selection dialogue box |
  
|
|
<< Click to Display Table of Contents >> Document code selection dialogue box |
  
|

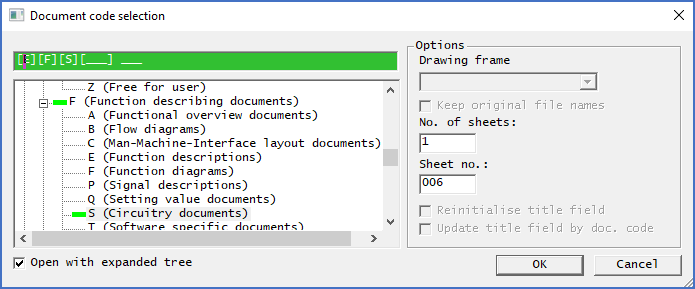
Figure 680: The Document code selection dialogue box
The Document code selection dialogue box, which is shown in the figure above, is involved in frequently used operations, such as New and Copy/paste.
The details of this dialogue box are described in the table below.
Field/check-box/section |
Description |
|---|---|
File name section (top left) |
The result of the document code selections that you have made are shown in this field.
If you know exactly what you want, it is also perfectly okay to type directly here.
The second option is to make your selection in the document code tree below, by simply clicking the desired codes.
As long as you have not made a useful specification of document code, the field in the upper part of the dialogue will be shown in red colour. On the other hand, any useful selection, even a non-selection, will be displayed in green colour.
How the file name should be structured is controlled by the project parameters.
|
Document code tree (left) |
How you select document codes in the trees displayed in this section of the dialogue box, is discussed in the text above this table.
|
Open with expanded tree |
When this option is activated, the tree will be displayed fully expanded, when you enter the dialogue box. If the option is deactivated, the tree will instead be displayed collapsed, when entering. If you have a large tree, like for instance when using the complete IEC1355 implementation, displaying it expanded, might sometimes make it unnecessarily hard to navigate in.
|
Drawing frame |
If the project is configured for multiple drawing frames, you can select which one to use for the drawing sheets that you create using the drop-down list in this field. (This can for example be used to select A3, A2 or A1). Multiple drawing frames are defined in the mask file. The default drawing frame, used when no selection is made, is defined by the project parameters.
Please refer to the Multiple drawing frames in the same project sub-topic for a description of the relevant mask file configuration.
Please refer to the Drawing frame sub-topic of the Project Module topic for a description of the relevant project parameter.
|
Keep original file names |
Not used for the New command
|
No. of sheets |
Here you enter the number of sheets that you want to create, specified with an integer. In other words, you can create more than one sheet at a time.
|
Sheet no. |
Here you can specify which sheet number the new sheet should have. The default is the first available sheet number within the specified document code after the highest that currently exists.
|
Reinitialise title field |
You can not set this option for the New command, where it is greyed out. It is in fact always active for New. When you use Paste, you can however decide for yourself:
•If this option is activated, all fields in the title field for which default values have been defined in the current mask file are given these default values.
•If the option is de-activated, the content of those fields in the originals are kept in the copies. Please note however what is stated below about document codes.
|
Update title field by doc. code |
This option is greyed out and thus not possible to change for the New command, since it is then always active. When you use Paste, you can however decide for yourself, if it should be active or not:
•If this option is activated, fields that are directly or indirectly connected to the selection of document codes are updated accordingly. In the ELSA390 mask, the DCC code is directly connected in that way. In the Example of user defined document codes that is described in a separate sub-topic, site, block, system, aggregate and DCC code are connected directly, while document number is connected indirectly.
•If the option is de-activated, no such update takes place. The original content of the affected fields is kept intact.
|
Ok |
When you click OK, the drawing sheet or sheets that you requested are created. Please note however, that the sheets are created in the Drawing Manager only, not yet physically as files. The latter does not take place until you issue the Reorganise command.
|
Cancel |
The Cancel button aborts the operation. No drawing sheets are created.
|