|
<< Click to Display Table of Contents >> Rearrange the wires of a chain |
  
|
|
<< Click to Display Table of Contents >> Rearrange the wires of a chain |
  
|
You can re-route the wiring order in a sub-node, for example if the result of the optimisation that cadett ELSA has made is not satisfying. Doing so is called to "rearrange the wires of a chain".
To make such a rearrangement, you first make sure that wire-numbering has been performed, meaning that the wire-numbers are stored in the circuit diagrams and that the wire list is completely up to date with the current state of the drawing sheets. The latter is confirmed by the absence of a little icon in the lower right corner of the screen, which turns up when the list is not fully updated. If that icon is visible, the list is not or may not be up to date. You should therefore click the Collect button to update the list and thereby get rid of the icon.
Note
There is also a slight possibility that the wire list may be out of date even if the program has not detected that. That could occur if the OnLine database is not properly synchronised with the content of the drawing sheets. The solution to that would be to regenerate the OnLine database.

Figure 1150: The icon to the right shows that the table is not fully updated. Click the “Collect” button to the left to solve the problem!
In the wire list of Dynamic OnLine I, you then right-click the wire-chain (the sub-node) that you want to change the wiring order in, and then you select the Rearrange the wires of a chain command in the context menu that appears.
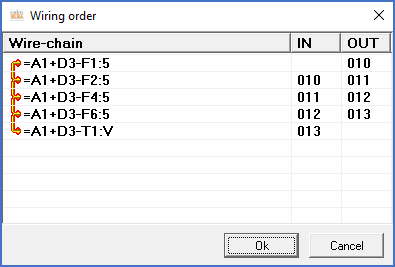
You will be presented with a dialogue box that displays the connection points within the wire-chain in the order that they are currently connected to one another. You can then use so-called drag-and-drop to adjust the wiring sequence. This means that you drag a connection point and drop it where you want it to be in the wire-chain. When you have rearranged the connection points in such a way that you are satisfied with the sequence, you can click the OK button.

Figure 1151: Dialogue for changing the wiring order
After you have clicked OK, the wires that have been changed will be marked with ticks in the left edge of the list.
Finally, you can save the changes you have made by clicking the Insert button in the lower part of the screen, or you can continue with other changes to the list before you save all changes with the Insert button. Please do not forget to save your changes in that way, since you otherwise will lose you changes and then will have to start all over again.
The changes that you save in this way are stored as updated wire-number attributes in the drawing sheets.