|
<< Click to Display Table of Contents >> How to start QuickPDF |
  
|
|
<< Click to Display Table of Contents >> How to start QuickPDF |
  
|
The QuickPDF feature can be activated in a number of different ways, of which the most obvious ones are described below.
Many would argue that the most prominent way of activating QuickPDF is from the File tab of the ribbon menu, where QuickPDF is available within the File ribbon, as shown in the figure below.

Figure 1337: QuickPDF in the ribbon menu
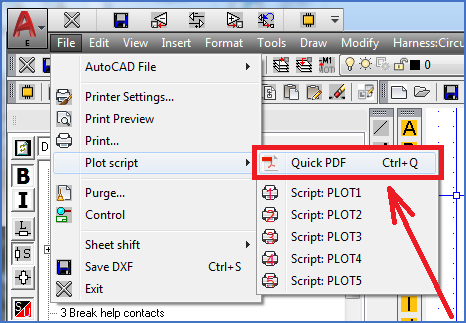
If you are using the old style cadett ELSA Classic workspace, you reach the QuickPDF feature either from the pull-down menus or from a toolbar.
In the figure below, you can see that the File pull-down menu contains a sub-menu called Plot script. The QuickPDF feature is available in that sub-menu.

Figure 1338: QuickPDF in the pull-down menu
An alternative to the pull-down menu, also available in the cadett ELSA Classic workspace, is the File toolbar, which is shown in the figure below, with the QuickPDF command marked.

Figure 1339: QuickPDF in the toolbar
An additional option is to activate QuickPDF from the keyboard. The quickest way is probably to type <CTRL_Q>, which will directly lead to the main dialogue of QuickPDF.
The command behind all the activation methods described above is CAELPLOTPROJECT_S. If you type that command on the command line, you will get two options, which are described in the table below.
Option |
Description |
|---|---|
Dialogue |
Activate the main QuickPDF dialogue box. This is identical with all alternatives described above.
|
Last |
Immediately start PDF generation with the same settings that you used the last time.
|