|
<< Click to Display Table of Contents >> Creating a new revision |
  
|
|
<< Click to Display Table of Contents >> Creating a new revision |
  
|
Before creating a new revision, please consider if the possibility to create lists of changed wires is desirable. If so, a complete wire-numbering followed by an insertion of the wire-numbers in the drawing sheets is required. Please refer to the Tutorial for a description of the associated procedure.
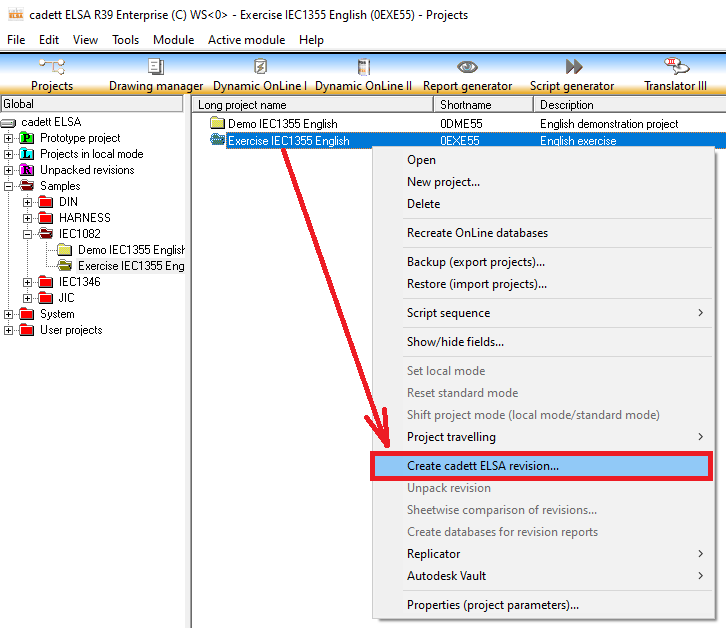
To create a new revision, eventually, please right-click the project in question in the right part of the project list in the Project Module. In the appearing context menu, please select Create revision… as shown in the picture below.

Figure 1459: Create a new revision using the right-click menu command shown here.
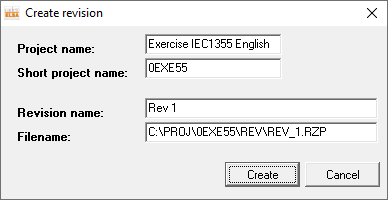
A dialogue box is presented. The picture below shows how it looks.

Figure 1460: This dialogue box is used to name a new revision.
In the field Revision name, it is possible to name the revision according to the wishes of the user. The default name is shown in the figure above.
The default name of the first revision is “Rev 1”, the second “Rev 2” and so on. It is however possible to use any names.
After making any desirable changes to the revision name, please click the Create button. The revision is then created.

Figure 1461: A revision called “Rev 1” has been created for the project “Exercise IEC1355 English”.
The figure above shows the project list after a revision has been created. The project in question, including the new revision itself, is shown within a red rectangle in the picture. As you can see, the revision is shown as a “sub-level” of the project.
If you would continue the work with the project from that point introducing new alterations, and eventually create a second revision, possibly after updating the wire-numbering, the view would be like shown in the figure below.

Figure 1462: A project with two revisions, thus having three states simultaneously
Please note that the project is then stored in three separate “states”:
•The current state (the “top-level”)
•The previous revision (“Rev 2” in this case)
•The first revision (“Rev 1” in this case)