|
<< Click to Display Table of Contents >> Contacts for contact mirrors |
  
|
|
<< Click to Display Table of Contents >> Contacts for contact mirrors |
  
|
You can get to the Contacts dialogue box in two different ways. One is when creating new contacts, the other when editing existing ones.
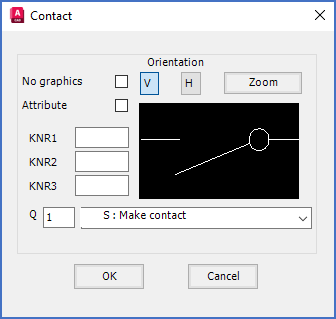
To create new contacts, you click the Contacts >> button in the Symbol data dialogue. The Contact dialogue box that is shown in the figure below is then displayed.

Figure 861: Entering the "Contact" dialogue box when creating a new contact
To edit an existing contact, you double-click the function object of that contact. The Contact dialogue box will then be displayed, but it will look a little bit different than when creating new contacts. The reason is that when you create new contacts, some fields will be empty or have default values when you enter the dialogue, while they will contain existing values when editing existing contacts.

Figure 862: Entering the "Contact" dialogue box by double-clicking an existing contact
You use the dialogue to specify or edit the details of a contact.
If you are editing an existing contact, and click the OK button, you exit the dialogue and the changes you have made in the dialogue are transferred to the function object (the contact).
If you are creating a new contact, and click the OK button, you can then insert the contact that you have specified. When that is done, you come back to the Contact dialogue, where you can either define yet another contact, or click Cancel, if you have defined all the contacts you need.
As you can see, there are quite a few details here to consider. They are described in full detail in separate sub-topics listed below.
•Orientation V H radio buttons
•Insert function object for contact