|
<< Click to Display Table of Contents >> Editing of filter and sorting |
  
|
|
<< Click to Display Table of Contents >> Editing of filter and sorting |
  
|
You specify filter and sorting in two tables. You will find the filter table on the left side and the sorting table on the right side. You select the table you want to work with by clicking it with the mouse.

Figure 1229: The tables for Filter and Sorting
You can type directly in the tables. By clicking twice in any of the fields you will in applicable cases reach a drop-down list where you can choose between the alternatives that are available for the specific field.
You can use the New button if you want to add a row in any of the tables. Then a new empty row will be added at the bottom of the selected table.
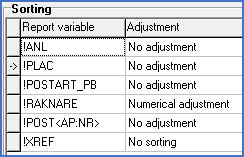
If you instead want to add a new row between two already existing rows, start by selecting the row below where you want to add the new row. You do this by a mouse-click in the grey box directly to the left of the row in question. A small arrow shows which row has been selected.

Figure 1230: The arrow to the left shows the selected row
Then use the New between button in the toolbar. A new row is added above the selected one. Thereafter you can add the information that you want to have in the new row.
If you want to delete a row, you start by selecting the row in question, clicking in the little grey box to the left in the row. A small arrow shows the selected row. Thereafter, use the Delete button in the toolbar. The selected row is then deleted.
Below follows a description of how filtering works and how you can enter filter conditions. Then the opportunities of sorting and how they can be specified are described.