|
<< Click to Display Table of Contents >> Other project parameters |
  
|
|
<< Click to Display Table of Contents >> Other project parameters |
  
|
A cadett ELSA project has a large number of settings, called Project parameters. One of all these project parameters determines where in the tree structure the project is located. Another example of a project parameter, is which symbol library to use. A further example is the choice of drawing frame.
When you create a new project in cadett ELSA, you always do it based on an existing project. The new project will then inherit all project parameters from the project you started from. That way, it will be easy to create a new project, despite the fact that there are hundreds of settings resulting in many millions of unique combinations. You inherit complete settings that are ready to use.
A common practice is to create so-called "prototype projects", which are projects with appropriate settings for your own way of working that are used only as a starting point for creating new projects. There may be reason to have more than one prototype project. It is possible that you need to use different settings or project parameters in different contexts. This may be especially relevant for consultants who work with several clients who may follow different standards.
When you create a new project based on an existing one, the new project will inherit all project parameters, including the location in the tree structure. To make it easier to find all prototype projects, they are presented in a virtual group simply called Prototype projects. This means that a prototype project actually belongs to a regular group, for example User projects, but it is not shown there. The prototype project is instead displayed in the virtual group named Prototype projects. If a project is a prototype project or not, is determined by a project parameter.
A detailed description of all project parameters is found in a topic named Project parameters (detailed description). Here and now, however, we will limit ourselves to a quick look at them.
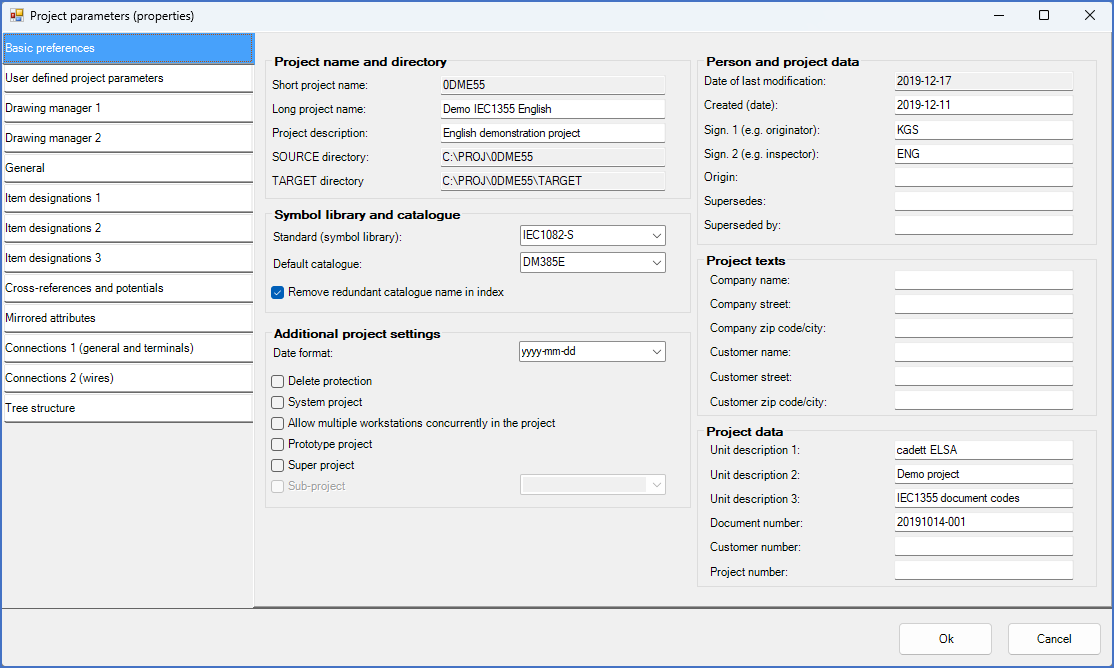
To access the Project parameters of a project, you right-click on the project and then select Properties in the context menu. A dialogue box will then present all project parameters. Please refer to the figure below.
As you can see, the dialogue box contains several tabs, each of which contains a number of project parameters. Which tab to access is selected to the left in the dialogue box.
To take a few examples, it is stated in the project parameters which symbol library to use, which drawing frame to use, how rows and columns are divided so that it is possible to calculate cross-references, which layers to use, how the item designations and cross-references are composed, how terminals are numbered, how connections are handled, and of course where in the tree structure the project belongs.
Normally, you will never touch most of these project parameters. In the first tab - Basic preferences - however, you will find several project parameters that may be necessary to adjust for most projects.

Figure 60: The dialogue box that is used to view and edit the project parameters
At the top left you will find the long and the short project name. The short project name (the "project id") is usually an automatically created key without other meaning. (Example: 1MJCHB3). It can however also be defined manually, when a project is created. The short project name may also be used as directory name for the so-called SOURCE directory, which is the main directory of the project, where the files of the project is located. As an alternative, an adjusted version of the the long project name can be used for that purpose instead.
This Basic preferences tab also contains a large number of pure text parameters, like the signature of the originator. At the bottom right you will find Unit description 1, 2 and 3, Document number, Customer number, and Project number. Project data like those are often found in the title fields of the drawing sheets. In fact, these texts are often used as default values when creating new drawing sheets.
At the bottom left, you will find a check-box where you decide whether the project in question is a Prototype project or not. That parameter determines whether the project should be presented at its own position in the tree structure or in the virtual Prototype project group.