|
<< Click to Display Table of Contents >> New resource, example |
  
|
|
<< Click to Display Table of Contents >> New resource, example |
  
|
Here an example of how it is possible to register a new resource in the Catalogue is presented. The example provides a good overview of important functionality and important principles in the catalogue.
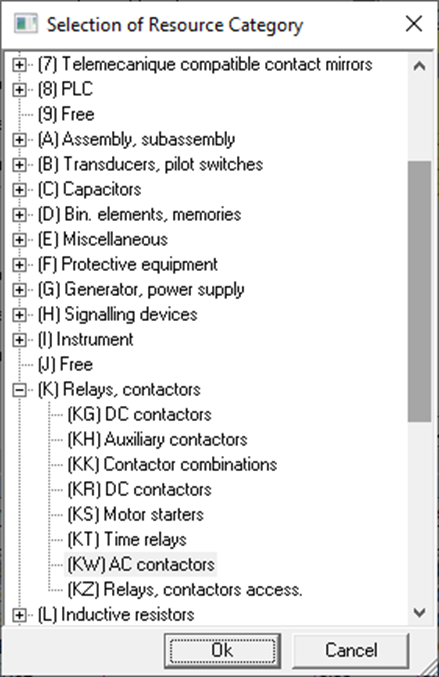
1.Click the New button in the toolbar. You will be presented with a dialogue box where you must select resource category for the new resource.

Figure 1821: Selection of Resource Category
2.Let us assume that the resource you are going to create is a signal lamp. As you can see in the dialogue, the device groups are divided into a tree structure. Then select device group H for Signalling devices. You can expand the tree using the plus sign on the left. It then turns out that the signalling devices are divided into several subgroups. You will find a suitable subgroup for your signal lamp, namely HM, which stands for Signal lamps. You select M and click OK.
In the resource group definition, which is supplied at delivery of cadett ELSA, there are three levels for the resource categories. For signal lamps, however, only two levels are used. You always have the option to select resource categories at any of the levels that are available i.e., not only at the lowest level.
3.The new resource is created in the catalogue with an automatically calculated default index. The DM385E demonstration catalogue uses a system where the index is made up of a code for the resource category and then a counting number. It should be noted that it is quite possible to use completely different solutions when it comes to index codes. It is e.g., possible to enter the index completely manually if desired. In this case, however, you accept the default index.
4.Then go on to the description, which you will find in the detailed view with exactly that name, Description.
You have received an automatically generated default description, namely "Signal lamp". It is of course not very appropriate to use the description "Signal lamp" for all signal lamps since it would then be very difficult to distinguish them. Therefore, please supplement with an appropriate distinguishing information.
5.Then add long description, electrical data, E-number, manufacturer, supplier, type number and ordering number.
6.Proceed to the Data detailed view.
No numbering algorithm is relevant for a signal lamp. There is also no limit. The module should be one and a layout symbol may not be relevant to begin with.
Enter height, width, and depth in millimetres. Enter any price information. Other stock data are normally not filled in manually.
7.Then go to the Symbols detailed view.
It is often appropriate to specify symbols for both horizontal and vertical drawing sheets, such as IEC1082-L and IEC1082-S.
To make a new symbol entry, use the New button in the lower part of the Symbol detailed view. A new line is thus created. Start by specifying the standard to which the new symbol refers, by using the drop-down list that appears to the right in the left column. For example, select IEC1082-S.
Then specify the Document type. Set it to Circuit Diagram. You do that by first selecting setting focus to the Document type field, by clicking twice in that field, with the left mouse button. Please note that it should be two single clicks, not one double click. After doing that, a drop-down list will be available in the right part of the field to make your choice.
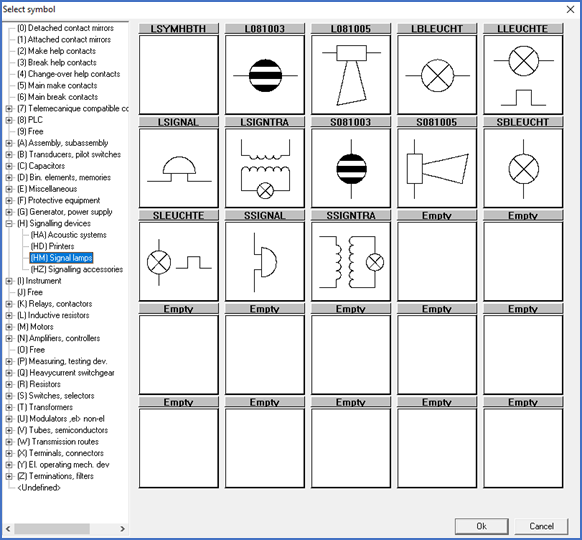
Then move on to the name of the symbol. You can enter the name of the symbol manually in the third column or use a selection. First set focus to the Symbol field using two single clicks. Then you can enter the symbol name by manual typing, or you can use a selection. To select, click twice on the select button to the right in the field. You will then be presented with a dialogue box that shows symbols within the resource category to which the resource in question belongs.

Figure 1822: Selection of symbol
You can then step through all the available symbols, including those in other resource categories, and select the one you want to use. The dialogue box thus shows the symbol name, resource category affiliation and an image of each symbol.
For a signal lamp drawn vertically, you will find e.g., the symbol SBLEUCHT which is well-suited for the purpose.
8.Repeat the procedure for horizontal drawing sheets with the symbol standard IEC1082-L. The symbol name will be quite like the previous one but with the letter “L” first. The symbol name thus becomes LBLEUCHT.
In the standard symbol library of cadett ELSA, all vertical symbols have names beginning with the letter “S”, while all horizontal symbols have names beginning with the letter “L”. As you will see later when creating your own symbols, it is advisable to use a different system for these so that you do not risk confusing your own symbols with cadett ELSA's standard symbols. By clearly distinguishing user defined symbols, you do not risk overwriting any standard symbols or having your own symbols overwritten by new standard symbols for example when the software is updated.
9.Once you have entered symbol indications in this way, the resource is complete.
10.The new resource is highlighted in green in the survey. This means that the information has not yet been saved to the central database. The next time you press the Reorganize button, everything you have entered is saved and the green marking disappears.
If you forget to press Reorganize when you exit the Catalogue, you will receive a reminder and a question if you do not want to save your changes after all.